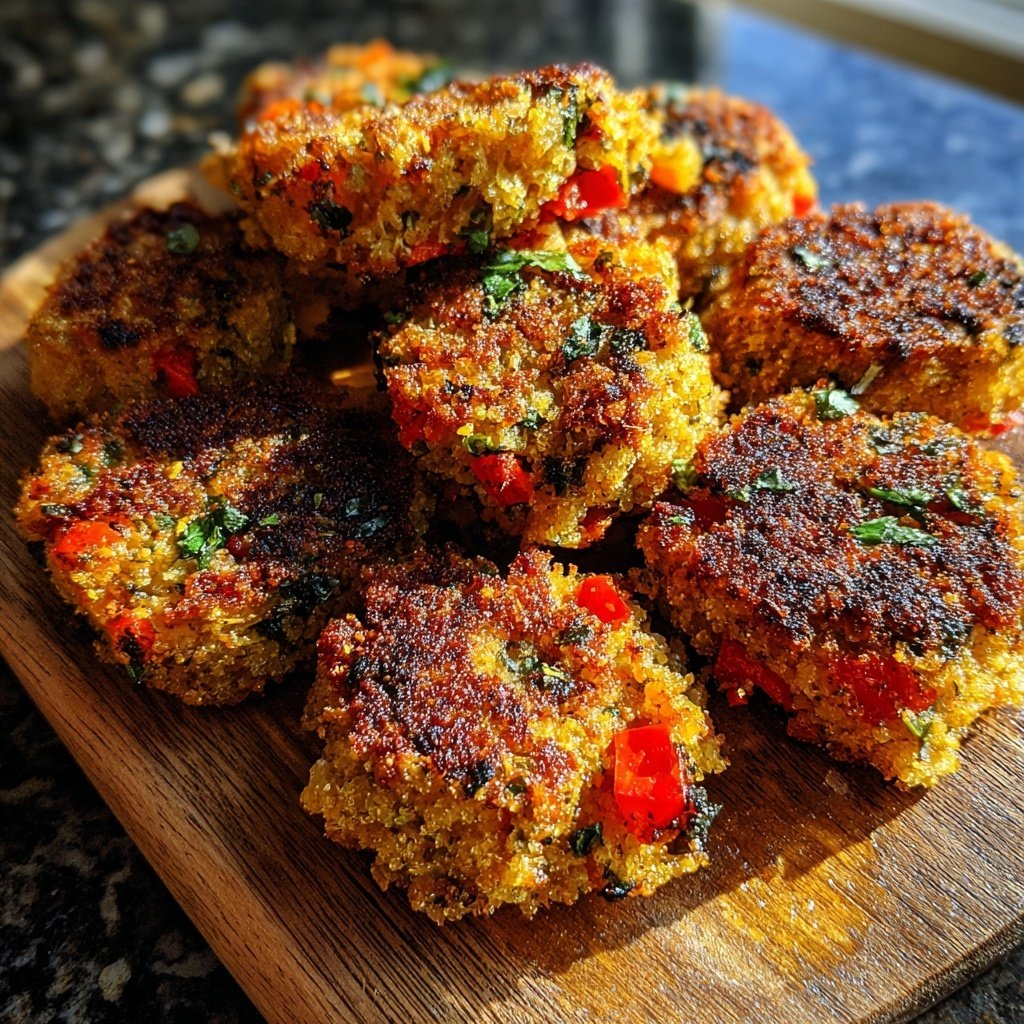
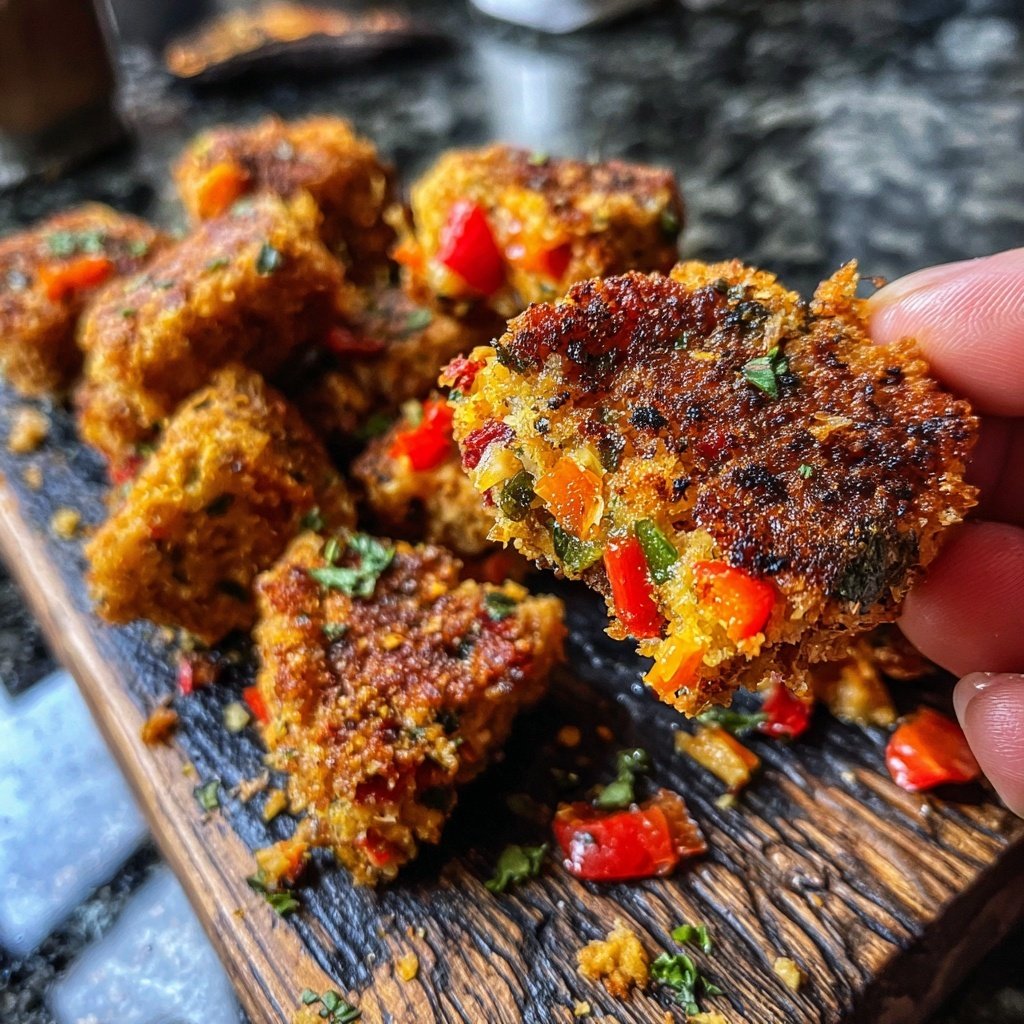
Crispy Tofu Veggie Nuggets
Highlighted under: Lightly Delicious
I absolutely love making Crispy Tofu Veggie Nuggets for a quick lunch or a fun snack! The combination of flavors and textures really hits the spot, and whenever I serve them, they disappear quickly. The key is to ensure that the tofu is well-pressed and seasoned before coating it with breadcrumbs. This method gives the nuggets a satisfying crunch while keeping the insides perfectly tender. Plus, these nuggets can be customized with your favorite veggies, making them a truly versatile dish!
When I first decided to create Crispy Tofu Veggie Nuggets, I wanted a recipe that not only tasted good but also packed a nutritional punch. I experimented with various seasonings and vegetable blends. After several attempts, I found that the addition of garlic and paprika really enhanced the flavors, while a blend of broccoli and carrots provided great texture.
One of my best tips is to let the tofu sit for a while after pressing it to release any excess moisture. This ensures that the nuggets are crispy on the outside and fluffy on the inside. I’ve also discovered that using panko breadcrumbs makes a major difference in achieving that satisfying crunch. Trust me, these nuggets will be a hit with everyone!
Why You Will Love These Nuggets
- Perfectly crunchy exterior with a soft, flavorful center
- Packed with nutritious veggies that you can customize to your taste
- Great as an appetizer, snack, or even a meal
- Easy to make and bake for a healthier option
Technique Tips for Perfect Nuggets
Pressing the tofu is a crucial step in achieving the right texture for your nuggets. It not only eliminates excess water but also allows the tofu to absorb the flavors from the seasonings better. I suggest using a tofu press if you have one, or alternatively, wrapping the block in a clean kitchen towel and placing something heavy on top, like a cast-iron skillet. Let it sit for at least 15-20 minutes for optimal absorption.
When mixing the ingredients, be mindful not to overmix. You want the mixture to hold together without becoming mushy. Gently fold in the chopped vegetables until evenly distributed. This will help maintain the nuggets' structure during cooking, preserving that delightful crunch on the outside while keeping the inside tender.
Shaping the nuggets can be a fun, hands-on step. For consistent sizes, consider using a cookie scoop or your hands to portion out the mixture. This not only ensures even cooking but also makes for a uniform appearance. Aim for nuggets that are about 1 inch thick to achieve the right balance between crispy exterior and soft interior.
Baking vs. Frying: What's Best?
Frying the nuggets results in a crispy texture that many find irresistible. Use a skillet with enough oil to cover the bottom; it should shimmer but not smoke. Frying typically takes around 3-4 minutes per side. Look for a golden brown color as an indication that they're ready to turn. If you prefer a healthier option, baking is equally effective. Preheat your oven to 400°F (200°C) and give the nuggets a light spray with oil to promote browning, baking them for about 20 minutes and flipping them halfway through.
If you choose to fry, be aware of common pitfalls such as overcrowding the pan, which can lead to soggy nuggets. It's best to cook in batches to maintain the oil's temperature, which should be around 350°F (175°C) for frying. A digital thermometer can be incredibly helpful for ensuring you're at the right heat level.
Baking offers a more hands-off approach, but for the crispiest results, try these nuggets on a parchment-lined baking sheet. You can even boost crispiness by using a wire rack over the sheet, allowing heat to circulate around the nuggets directly.
Variations and Serving Ideas
Customization is one of the best features of these nuggets. Feel free to swap out the mixed vegetables for whatever you have on hand or prefer! Try bell peppers for sweetness, corn for flavor bursts, or even spinach for added color and nutrients. Just ensure to chop them finely so they integrate well into the mixture and maintain the nugget's structure while cooking.
These nuggets are a fantastic appetizer, but they can also be the star of a meal. Serve them in a wrap with fresh greens and a tangy sauce for a delightful lunch or dinner. For dipping, consider pairing them with homemade tahini sauce, sweet chili sauce, or classic ketchup. The right dip can elevate the entire experience.
If you end up making a large batch, these nuggets freeze beautifully. Arrange them in a single layer on a baking sheet after shaping, freeze until solid, and then transfer them to an airtight container. They can be baked straight from the freezer, extending their shelf life while ensuring you always have a quick snack or meal option on hand.
Ingredients
Gather your ingredients before starting to make the process smoother!
For the Nuggets
- 1 block of firm tofu, pressed and drained
- 1 cup of mixed vegetables (broccoli, carrots, peas), finely chopped
- 1/2 cup of breadcrumbs (preferably panko)
- 1/4 cup of all-purpose flour
- 2 tablespoons of nutritional yeast
- 1 teaspoon of garlic powder
- 1 teaspoon of paprika
- Salt and pepper to taste
- Oil for frying or baking
Make sure to check your pantry for additional seasonings you might want to add!
Instructions
Follow these steps closely for the best results!
Prepare the Tofu
Begin by pressing the tofu for at least 15 minutes to remove excess moisture. Then, crumble the tofu into a large mixing bowl.
Mix the Ingredients
Add the finely chopped veggies, breadcrumbs, flour, nutritional yeast, garlic powder, paprika, salt, and pepper to the bowl. Mix everything until well combined.
Shape the Nuggets
Take a handful of the mixture and shape it into nugget forms. Repeat until the mixture is used up.
Cook the Nuggets
Heat oil in a skillet over medium heat or preheat your oven to 400°F (200°C). Fry the nuggets for about 3-4 minutes on each side until golden and crispy, or bake for 20 minutes, flipping halfway.
Serve and Enjoy
Once cooked, transfer the nuggets to a paper towel to drain excess oil. Serve warm with your favorite dipping sauce!
Enjoy your delicious, homemade nuggets! Perfect for any occasion.
Pro Tips
- Experiment with different vegetable combinations and seasonings to make these nuggets your own. You can also freeze uncooked nuggets for quick meals later!
Storage and Make-Ahead Tips
Once cooked, store any leftover nuggets in an airtight container in the refrigerator for up to three days. Reheat in a preheated oven at 375°F (190°C) for about 10 minutes to retain their crispiness. Avoid microwaving as it can make the nuggets soggy instead of maintaining that satisfying crunch.
If you plan to meal prep, you can assemble the nuggets in advance but keep the uncooked mixture in the fridge for up to two days. Just be sure to check that your vegetables are fresh and not wilting, as their quality can greatly affect the final nugget texture and flavor.
To ensure maximum freshness, I recommend freezing uncooked nuggets if you won't use the entire batch right away. This allows you to enjoy them at your convenience. When ready to cook, there's no need to thaw—just bake or fry directly from the freezer, adjusting cooking times slightly.
Troubleshooting Common Issues
If your nuggets are breaking apart during cooking, it might be due to not enough binding ingredients. The addition of breadcrumbs helps, but if the first batch crumbles, try increasing the amount slightly next time or ensure the mixture is nicely packed when shaping them.
Overcooked nuggets can become too dry, losing their tender center. Keep an eye on them while cooking, especially if you're getting accustomed to the timing. For frying, look for that golden-brown color, and for baking, ensure they reach that crispiness without going too far.
If you find your nuggets are lacking flavor, consider bolstering the seasoning next time. Garlic powder, paprika, and nutritional yeast not only enhance the taste but also the overall appeal. Tasting the mixture before forming the nuggets can help adjust seasoning levels for your preference.
Scaling the Recipe
This recipe is easily scalable if you're hosting a gathering. Simply multiply the ingredient quantities by the number of guests you're serving. Keep in mind that cooking times may vary slightly with larger batches, especially if frying, as you'll need to ensure the oil temperature remains consistent.
If you’re doubling the batch for freezing, I recommend using multiple baking sheets to maximize your cooking space in the oven. It also allows for more even baking or frying; just remember if you're using multiple trays in the oven to rotate them halfway through the cooking time for uniform results.
When scaling, be sure to account for ingredient substitutions based on available vegetables or dietary preferences. It helps to mix and match, experimenting with different veggies each time you make a batch to keep things exciting and appetizing!
Questions About Recipes
→ Can I use other types of vegetables?
Absolutely! Feel free to mix and match with any vegetables you have on hand, such as zucchini or bell peppers.
→ What can I substitute for tofu?
If you’re not using tofu, you can substitute it with mashed beans or lentils for a different texture.
→ How long will the nuggets keep in the fridge?
The cooked nuggets can be stored in an airtight container in the fridge for up to 3 days.
→ Can I bake these nuggets instead of frying?
Yes! Baking is a healthier option. Just preheat the oven and follow the baking instructions in the steps.
Crispy Tofu Veggie Nuggets
Created by: Elara Whitfield
Recipe Type: Lightly Delicious
Skill Level: Intermediate
Final Quantity: 4 servings
What You'll Need
For the Nuggets
- 1 block of firm tofu, pressed and drained
- 1 cup of mixed vegetables (broccoli, carrots, peas), finely chopped
- 1/2 cup of breadcrumbs (preferably panko)
- 1/4 cup of all-purpose flour
- 2 tablespoons of nutritional yeast
- 1 teaspoon of garlic powder
- 1 teaspoon of paprika
- Salt and pepper to taste
- Oil for frying or baking
How-To Steps
Begin by pressing the tofu for at least 15 minutes to remove excess moisture. Then, crumble the tofu into a large mixing bowl.
Add the finely chopped veggies, breadcrumbs, flour, nutritional yeast, garlic powder, paprika, salt, and pepper to the bowl. Mix everything until well combined.
Take a handful of the mixture and shape it into nugget forms. Repeat until the mixture is used up.
Heat oil in a skillet over medium heat or preheat your oven to 400°F (200°C). Fry the nuggets for about 3-4 minutes on each side until golden and crispy, or bake for 20 minutes, flipping halfway.
Once cooked, transfer the nuggets to a paper towel to drain excess oil. Serve warm with your favorite dipping sauce!
Extra Tips
- Experiment with different vegetable combinations and seasonings to make these nuggets your own. You can also freeze uncooked nuggets for quick meals later!
Nutritional Breakdown (Per Serving)
- Calories: 230 kcal
- Total Fat: 10g
- Saturated Fat: 1g
- Cholesterol: 0mg
- Sodium: 150mg
- Total Carbohydrates: 24g
- Dietary Fiber: 3g
- Sugars: 2g
- Protein: 12g